HOW DO I KNOW WHICH RESISTANCE TO BE AT?
When you take a Power Cycle class you will hear us refer to gears/resistance, RPMs (speed) and at times WATTS (or power output). …but what if you don’t have a Schwinn AC Performance Plus bike like we do?
You can start by looking at comparison charts to get an “idea” of where you should be in regards to resistance/gears. Our bikes go up to a maximum of 30 within the bike gear system. So, for example, if you are on a Peloton on we say we are going uphill at a gear 18, you should be “around” a 70 or on an Echelon that would be, again “around”, a gear 19.
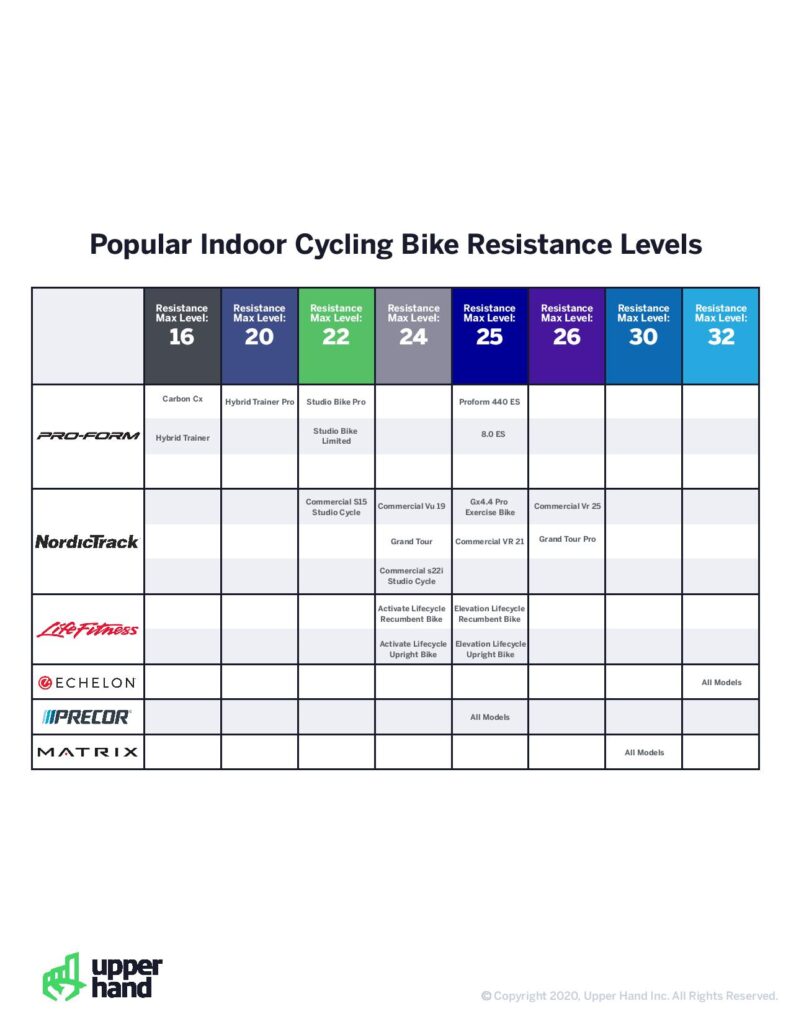
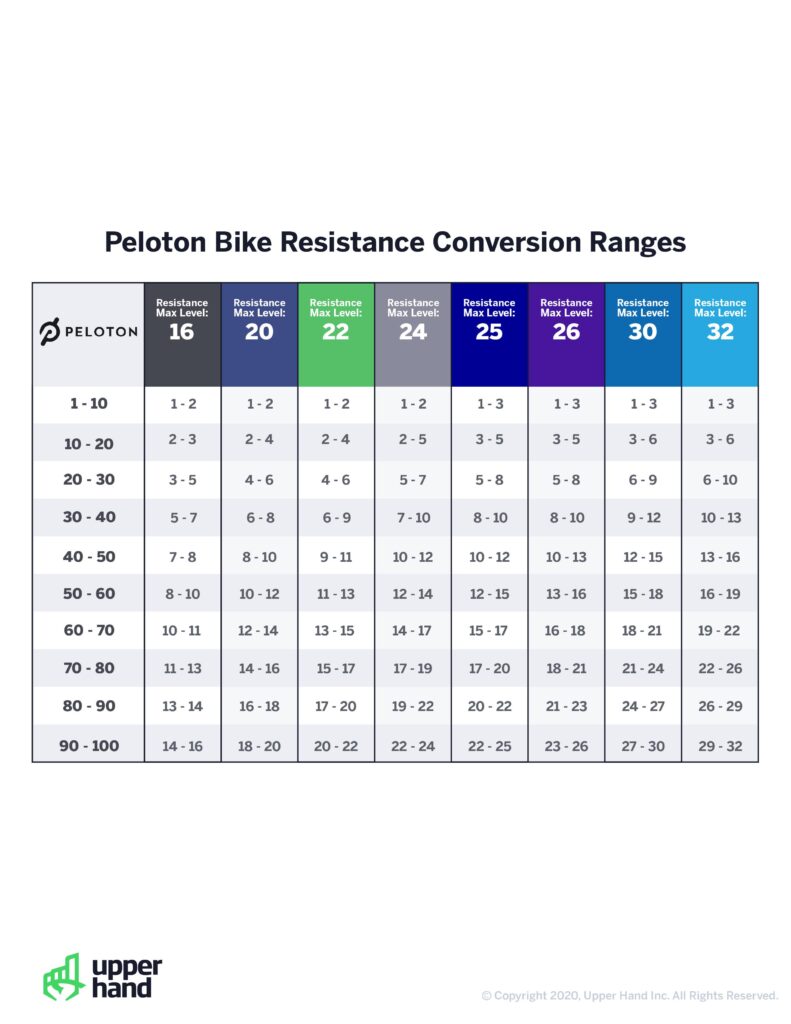
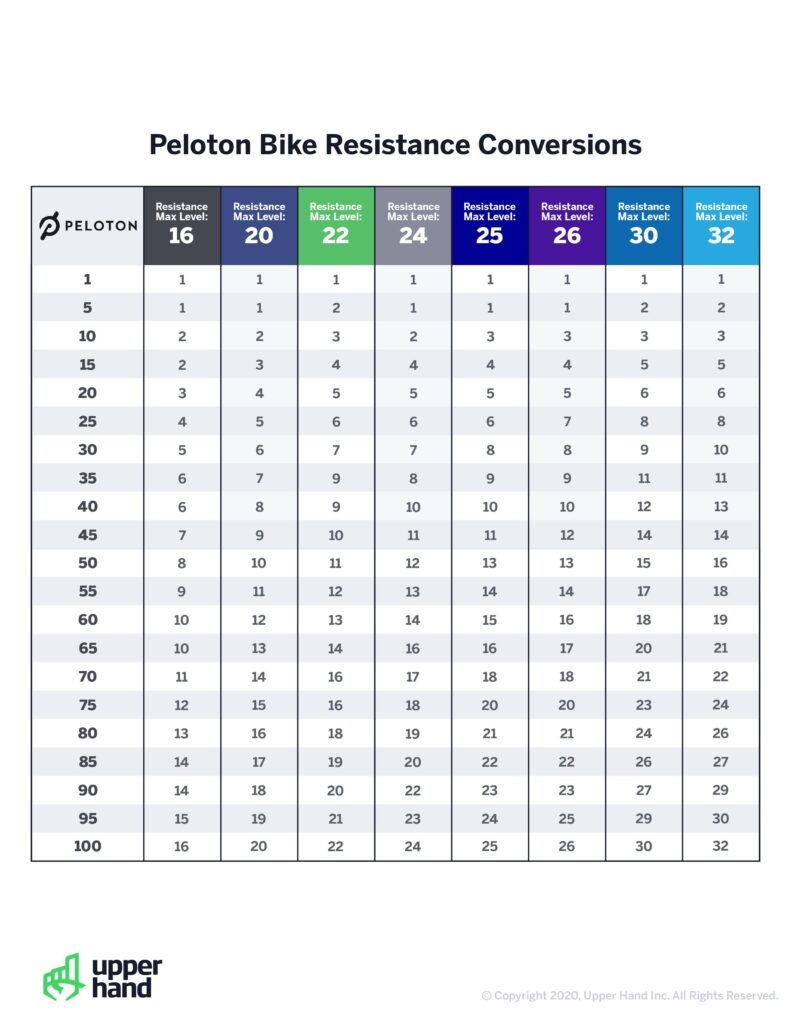
Since bikes are calibrated all differently and everyone is working at their individual ability level, during Power Cycle rides we will also refer to “percentage of your maximum gear load.” We like to always keep our steepest hill speed at 35 RPM or quicker, so your “maximum gear load” is the highest resistance YOU can be at when you can BARELY keep it at 35 RPM. When we are on our bikes, a typical STEEP hill for most (not all!) will be around our gears 18-22 which we call out as “90-100% of your maximum gear load.”
The BEST way to ride is to go off how you are feeling! Don’t get TOO caught up in the numbers. They can be great motivators but when we are describing a flat road, hill or another part of the class, try and mimic what that would truly feel like. Also, we focus a lot on pairing our course to our music, so if you are getting into that beat with us, and using the music to motivate you, it will be a much better workout! Finally, have some FUN! We want you to be out of breathe and sweating, but we also want you to say “Now that was FUN! I sure do miss being IN the studio!” We have been rocking some awesome (and completely safe) indoor cycling classes and our goal is to bring some of that authentic energy home to YOU!
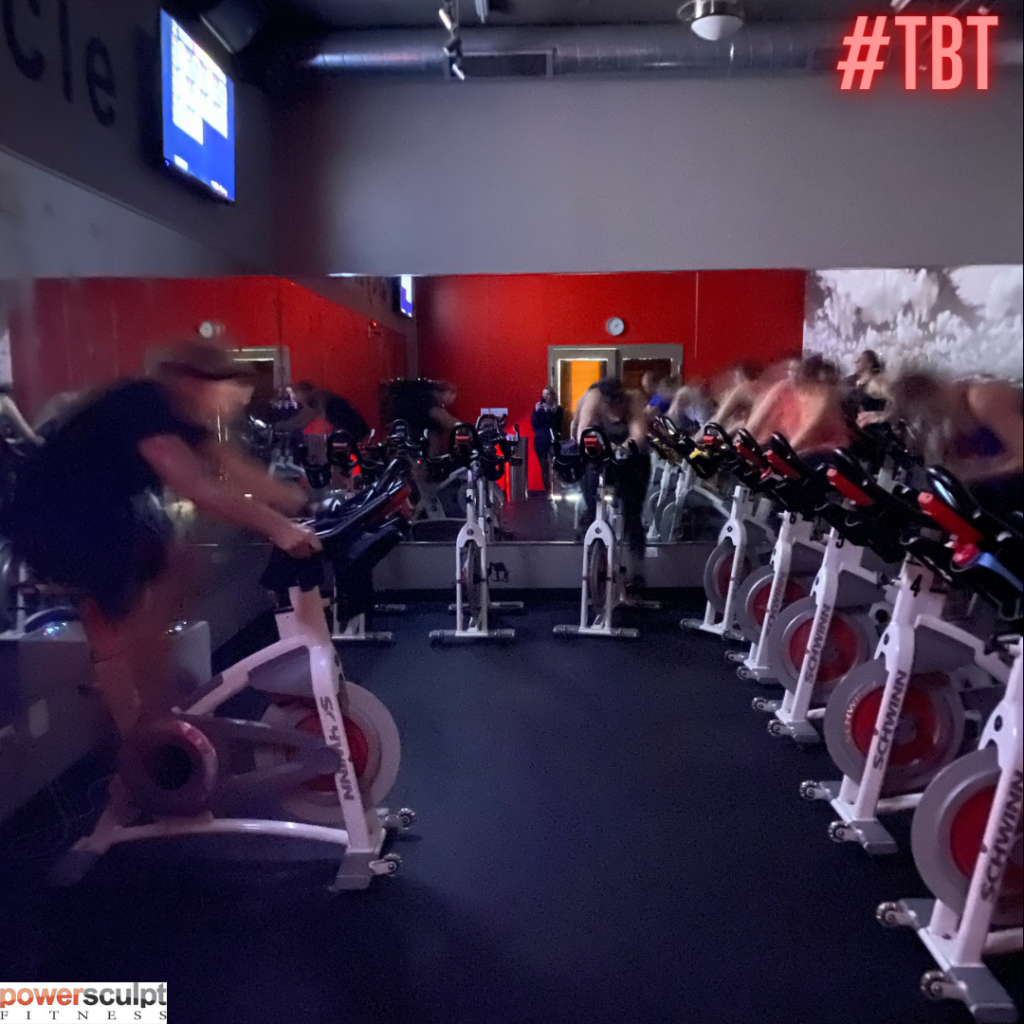
5 Tips for a Great Indoor Cycling Experience
1. The right adjustments:
Everyone will have to make adjustments in order to have the most comfortable experience during their cycling class. These adjustments are based mainly on the individuals height, arm, and leg length.
The three main adjustments are handlebar height, seat adjustment and fore-aft adjustment.
Adjusting your seat: You want a slight degree of bend in the knee at the farthest point the foot is away from the body when you’re pedaling, so the foot would be at the bottom of the pedal stroke. Most people don’t like to sit too high, but they will sit way too low, and that’s crunching them up and can be dangerous for ligaments and joints.
Adjusting your fore-aft: The ball of the foot should be right on the spindle so as you’re pedaling you’ve got the widest, strongest part of your foot pushing. You want the front of your knee right in line with the ball of your foot when the pedal is farthest forward, to put all those massive leg muscles right in the center of these circles you’re turning.
Adjusting your handlebar height: That’s a function of comfort. If you’re flexible, you’ve got a strong core, a strong lower back, you can ride a little lower. But if you’re new, you want to be up a little higher to take the stress off. Ultimately, if you’re comfortable you’re going to be efficient, and if you’re efficient you’re going to be powerful, and if you’re powerful you’re going to burn calories.
2. Keep the right resistance throughout the entire class:
Finding the right tension on your bike can be the difference between having a worthwhile and wasted workout; it’s also key in preventing injury. Even at its lightest, you should always feel a tiny bit of resistance under you, otherwise you will lose control, the bike will get ahead of you, and you’ll end up just spinning the pedals. Too much resistance and you’ll find that pedaling is almost impossible. Even when working yourself up a hill, you still want to maintain a regular rhythm of pushing and pulling
3. Have trust in your instructor:
There is a reason your instructor is your instructor. Trust that when they tell you not to put too much weight on your handle-bars or to raise them to avoid hunching over, it is for good reason. You may be an experienced outdoor cyclists, but things are different when on an indoor stationary bike. Using your forearms to lean on your handle bars may be okay out on the roads, but in a cycling class it can cause lower back pain. Keep your weight in your saddle and push your energy through your feet, not your upper body.
Keeping your handle bars higher or even with your saddle is also important in having a safe and comfortable class. Mountain bikers will argue that they need that lowness for absorbing shock on a descent down unstable terrain, which is true. However, this quad and glute strength should be found off the stationary bike through more traditional squats and lunges, because hovering (keeping the body still and low while pedaling) does not mimic what happens on the bike outdoors. Generally pedaling stops on descent, and to continue to pedal on an indoor cycling bike while holding the body low and still is more stressful on the knees, hips and lower back than it would be to just gain that strength on the weight room floor.
4. LISTEN to what your instructor is saying:
We know it is easy to get lost in your own thoughts while pushing through any workout, but during any instructional class it is important to keep your ears open for your instructors cues. During your cycling class you can expect to hear words like, “ full turn”, “ quarter turn”, and reference to what level they want you to feel your resistance/power/etc. at. Listening for these cues will also help you prepare for what is coming up next. For example, if your instructor tells you they want 3 full turns to the right or ‘add on some power’, you can expect an incline coming in your workout. When your instructor tells you to turn it to the left (loosen up that resistance) or drop the resistance you can expect to increase your speed and meet them at a flatter road. When your instructor says things like, “match my speed” or “pick it up” you know he/she wants you to really pedal it out and give them some speed.
5. Get Creative! Visualize your course:
It can be easy to get confused and lost in your cycling workout when you are focusing on the fact that you are indoor and stationary. Your instructor should help you move past this mental block by creating some sort of vision for you. For example, when you start to add heavy resistance your instructor might say something like “ we are pedaling up a steady hill of mud.” This is something that can help you reach the resistance level your instructor wants you at. When your instructor tells you that you will be coming down-hill, you know you are going to want to loosen up your resistance and start to feel some speed underneath your feet. Really use these cues to help push through your workout when you are having trouble challenging yourself, sometimes it really is all in your head!
HOW TO AVOID “SADDLE-SEAT”
Indoor cycling should not be a “pain in the butt”! Here are some tips to get a more comfortable ride so you can keep up with your workouts!
- Lower your seat: If the saddle is too high, this will cause you to shift your weight from side to side.
- Tilt the saddle: Tilting the seat slightly downward in the front will help alleviate pressure on the soft tissues. However, if the saddle is tilted too far down, you will place too much weight on your wrists and hands. The may result is numb hands and pain in the lower back.
- Stand in the saddle occasionally and adjust your riding position from time to time. This tends to happen automatically with mountain biking, but you may have to make a conscious effort to do this when road riding.
- Another tip that some men find helpful is to point the saddle slightly to the left or right, instead of aligning it directly parallel with the top tube.
- Relax and reduce the impact on your tailbone while spinning. When on the bike, your butt and thighs should relax over the seat. Tense up and you could be making things worse. During class, you’ll probably be instructed to sit and stand as part of the exercises — make sure you don’t slam yourself down into the seat, which could cause serious pain. Even if you’re tired, lower yourself into the saddle gently and your butt will thank you.
- Try a gel pad! Although it’s not ideal to swap seats, you can purchase a pad that stretches over a seat to offer a little more cushioning for your tush.
- Still feeling some pain in your butt? Purchase padded shorts that fit you comfortably. Wearing regular workout shorts will increase the chances for bike-saddle soreness. For women, there are shorts that have design features made especially for a women’s body structure. So, women shouldn’t assume any bike short will work. Seek out cycling shorts that are labeled as women’s cycling shorts.
